
FAQs
If the help still does not solve your issues, please send a message via ‘Contact Us’ and we will contact you and help you resolve the issue upon receipt.
1. Why can't download or install app
To use the app needs to match the system version of smart device.
Currently, only devices with Android5.0 or above, iOS9.2 or above are supported for download and installation.
(TV and Apple's computer products are not supported.)
Currently, only devices with Android5.0 or above, iOS9.2 or above are supported for download and installation.
(TV and Apple's computer products are not supported.)
1. Why do you need to create an account
You must use an email address to sign up and set the password for an account to use all the function of the app. We need to confirm the validity of the user's identity by checking the username and password. Only legitimate users can be authorized to view the corresponding camera and other related operations. This is a necessary way to ensure that your personal data is not accessed by others.
Please use your own email address to sign up the account cause you’ll need to get verification code to complete the procedure.
Please use your own email address to sign up the account cause you’ll need to get verification code to complete the procedure.
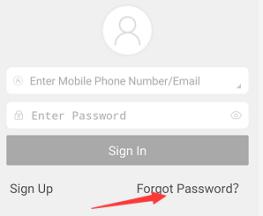
① In the login page, click the ‘Sign Up’ function;
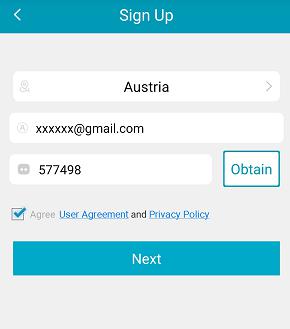
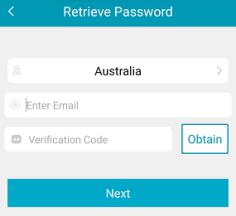
② Please select your country(it will help you to select the optimal server) and enter the email address in ‘Sign Up’ page. Then you can press ‘Obtain’ button and will receive an email. Please check the email and enter the ‘verification code’. Before click ‘Next’ button, you need to agree ‘Software Use Agreement’ and ‘Privacy Policy’ items.
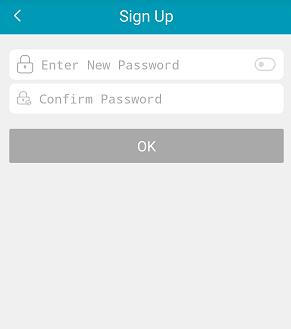
③ Set your password to complete the procedure.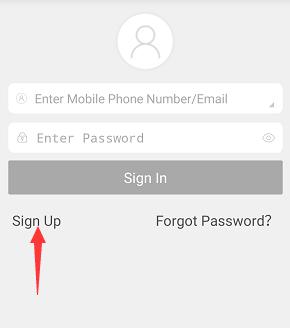
② Please select your country(it will help you to select the optimal server) and enter the email address in ‘Sign Up’ page. Then you can press ‘Obtain’ button and will receive an email. Please check the email and enter the ‘verification code’. Before click ‘Next’ button, you need to agree ‘Software Use Agreement’ and ‘Privacy Policy’ items.
③ Set your password to complete the procedure.
Some mailboxes or smart devices recognize the verification code message as spam and automatically store it in the trash can. Please check your inbox and trash can to see if you have a verification code email.
When you signing up a new account, the app has a prompt ‘This account has been registered’. That means this account existed already. If you forgot the password for the account, you may need to reset the password to login. To click ‘Forgot Password’ on the login page, then you can set a new password.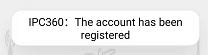
After entering the verification code, if the app prompts the verification code is wrong, please check the code you enter. Also, it may be that your verification code has expired. The verification code received by email is valid for 30 minutes. Please enter the correct verification code within the validity period to complete the registration.
1. Why the app needs the Location permissions
In Android 8.1 or above, iOS13 or above mobile phone systems, WIFI function and GPS function are bound together. That means if you want to access the WIFI information(for example, SSID name), you must have location permissions. When adding a camera, in order to improve the convenience of operation, it is necessary to automatically display the name of the WIFI that the current mobile phone is using, so the app needs to obtain the location permissions. In the subsequent service process, the user real-time positioning information will not be collected. You may cancel location permissions after added a new device. At any time, we will not collect user's location information and other personal privacy information, nor will we transmit or save relevant information to any server.
The App may need to scan QR codes(it is printed on camera usually) for helping you to add the camera, that will need to get the Camera permissions. If you feel unsafe, you can cancel this authorization in the system settings after you added the camera.
It is used to display notifications on the mobile phone when the app has a message, because the camera needs to notice you in time when something happens.
It is used to save pictures or videos from the camera to the mobile phone album.
It is used for make the conversation between the camera and app while you review the living video.
Our servers will relay the data which need transmit between Apps and cameras. These services are performed through a service program built on a network service provider in the United States or Europe(The main supplier is Amazon Web Service). In this process, the server authenticates the APP and the camera separately to ensure the correctness of the communication and ensure the security of the communication. The DES-based algorithm is used to encrypt the data during transmission.
The App and the camera establish a contact with the server through TCP for command.
The video and audio are transmitted by UDP.
The App and the camera establish a contact with the server through TCP for command.
The video and audio are transmitted by UDP.
1. What kind WIFI band is supported by camera
2.4G band WIFI: Applies to all devices;
5G band WIFI: Adding devices through 5G WIFI requires device hardware support. Please check the product package or manual to confirm whether this function is supported.
5G band WIFI: Adding devices through 5G WIFI requires device hardware support. Please check the product package or manual to confirm whether this function is supported.
If you are using a dual-band router that supports 2.4G and 5G both, the same WIFI name and password are used in both bands. You can also add a camera using the app. Otherwise, if your camera do not support 5G band, it may cause failed to add camera.
Please power on the camera. When the camera is started (about 30 seconds), use the reset tool to reset the camera: press the reset button and hold for about 2 seconds, the camera will make ‘di~di’ sound(if camera make ‘du~’ sound, press the reset button again), and the indicator light will flash slowly in red (once every 2 seconds).
Please power on the camera. When the camera is started (about 30 seconds),use the reset tool to reset the camera: press the reset button and hold for about 2s, the camera will make ‘du~’ sound(if camera make ‘di~di’ sound, press the reset button again), and the indicator light will flash fast in red (twice per second).
Please to be sure that the network cable is plug in the camera network port. After the camera is ready, press the reset button and hold for about 2s(refer the manual to find where is the reset button), and the camera will make ‘di~di’ sound, and the indicator light will flash slowly in red(once every 2 seconds).
A.Before you start to add a camera to your account, to be sure that the router you want to use worked normally
B.When adding, the camera does not make ‘ding~dong’ sound, and the indicator light still flashes slowly/fast
The camera does not make ‘ding~dong’ sound, it means that the camera has not received the information from the app. Please confirm the following:
① Does WIFI use the 5G band if the camera does not support the function of the 5G band for adding?
② Whether the added mode of use corresponds to the reset state of the camera?
③ To increase the volume of the mobile phone, so that the App may make ‘dididi~’ sound during the procedure. The sound could use for information transfer.
C.The camera say ‘wrong password’
The‘wrong password’ means the WIFI password is wrong or there are unrecognizable characters in the password. Please confirm the following:① When entering the WIFI password, click the clear button on the right to check the WIFI password.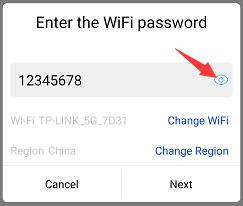 ② If there are special characters in the WIFI password, you can try to remove it, and try again.
D.The camera say ‘Unable to obtain IP address’
The‘Unable to obtain IP address’ means that the camera can't get IP form the router. Please confirm the following:
① Check if the router has the ‘DHCP’ function enabled (adding need to enable this function).
② Please restart both the camera and the router, then try again.
① Check if the router has the ‘DHCP’ function enabled (adding need to enable this function).
② Please restart both the camera and the router, then try again.
E.The camera make ‘di~di’ sound after the adding procedure
The ‘di~di’ means the camera failed to connect to the server or Camera start up abnormal.
Please confirm the following:
① Whether the router can connect to the internet normally?
② Restart camera, and try to add again.
③ Confirm if WIFI signal is too weak or has too many connected users.
Please confirm the following:
① Whether the router can connect to the internet normally?
② Restart camera, and try to add again.
③ Confirm if WIFI signal is too weak or has too many connected users.
1. How to format a memory card
The memory card needs to be formatted with ‘FAT32’ format on the computer before use.
A.Check if the memory card is recognized by the camera
You need to insert the memory card (TF card) when the camera is pow off. After the camera work normal (camera is bind to your account and online), you can check the information of the card with ‘Device Settings’ - ‘Memory Card Information’ function.
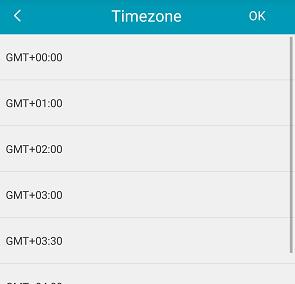
B.Check if the time zone is same between the camera and phone
Usually, the app will prompt you to adjust the camera time when the camera time does not match the phone system time. What you need to do is to confirm, unless you change manually. We strongly recommend that you do not change it.
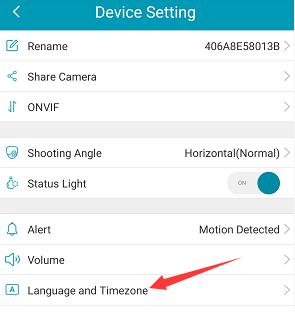
If you need to manually adjust the time zone, you can also modify the camera's time zone in ‘Device Settings’ - ‘Language and Time Zone’ - ‘Time Zone Setting’. As long as the camera's time is changed to match the time of the mobile phone system, the video can be viewed normally.
Note: If the time zone is wrong, you will find the footage showed in the app with wrong position at times axis. After make it correct, the new footage flag will be displayed in the correct position.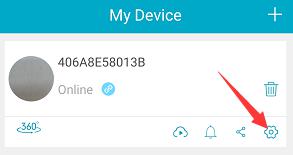
C.Check if the ‘video storage location’ is correct
When using a memory card to store videos, you need to select ‘Memory Card’ in ‘Device Settings’ - ‘Video Storage Location’.
D.Check the video storage mode
The App provides two recording modes. You can find it in ‘Device Settings’ - ‘SD Card Recording Settings’: Continuous storage / Storage for Alerts.
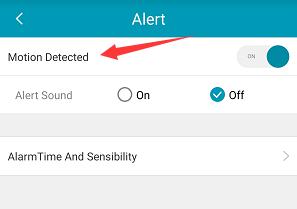
When you used ‘Storage for Alerts’, you need to enable the ‘Motion Detected’ function in ‘Alert’ , and you may need to adjust the alarm sensitivity to ensure that the alert can trigger by moving object.
When you used ‘Storage for Alerts’, you need to enable the ‘Motion Detected’ function in ‘Alert’ , and you may need to adjust the alarm sensitivity to ensure that the alert can trigger by moving object.
1. Will I be charged after the trial cloud storage service expires?
Do not worry about it. The trial cloud storage service is completely free. You don’t make any order, it will expire automatic. You will not be charged for any reason unless you make an order in app.
If you don’t want to use cloud storage, please tap the cloud icon under the device list bar in the app and switch ‘ Upload Video To Cloud’ function off.
If you don’t want to use cloud storage, please tap the cloud icon under the device list bar in the app and switch ‘ Upload Video To Cloud’ function off.
Normally you can view the stored video by sliding the time bar to the green/yellow line in the app.
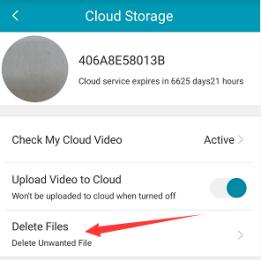
You can also tap on the camera's cloud icon under ‘My Device’ page in the app, then tap ‘Check My Cloud Video’.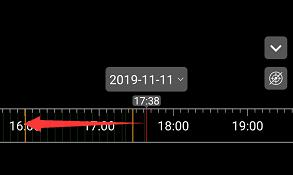
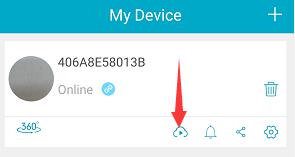
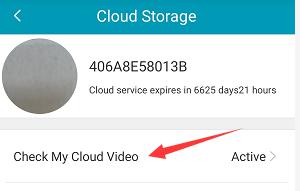
You can also tap on the camera's cloud icon under ‘My Device’ page in the app, then tap ‘Check My Cloud Video’.
You can go to the ‘My Devices’ page in the app, tap on the cloud icon under the device, then tap ‘Delete Files’, and set the time period that you want to erase the record. Please note that you can only delete cloud storage videos from 24 hours ago. 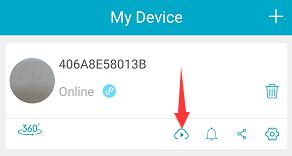

Because the cloud storage service is associated with the account of the app and the Mac (or UUID) number of the camera. Once the camera is bound with another account(or the account has been deleted and re-registered), the cloud storage service will be unavailable, and you could not find any historical cloud video. You may need to make an new order for it. The rule is set to protect your cloud data.
Note: Please use the function of deleting account carefully.
Note: Please use the function of deleting account carefully.
If you make duplicate order or cloud storage don’t work, you need to submit(using ‘Feedback’ function) the following information to apply for refund:
① Mac(or UUID) number of the camera
② A screenshot of the cloud storage service order that needs to be refunded: ‘My Device’ - ‘Cloud Storage Icon’ - ‘My Order’ (the most accurate way).
Once we received the email, we will connect you and start the procedure for refund.
① Mac(or UUID) number of the camera
② A screenshot of the cloud storage service order that needs to be refunded: ‘My Device’ - ‘Cloud Storage Icon’ - ‘My Order’ (the most accurate way).
Once we received the email, we will connect you and start the procedure for refund.
You can transfer the activated cloud service between different camera in same account. You can find the ‘Transfer the order to other camera’ function in ‘Setting’ page to transfer cloud storage orders. If you can not find it, please upgrade your app to lasted version.
A. The bill is paid, but the order could not be found in app
In this case, you need to send a message by ‘Feedback’ function in the app. We will help you to get refund or make an order for you manually.
B. No cloud video files
① Check if the camera’s time zone is same with the cell phone
② Try to restart both the camera and the router
③ Delete the camera from account in the app, then add it with same account again.
② Try to restart both the camera and the router
③ Delete the camera from account in the app, then add it with same account again.
The video cloud storage service is related to your account number and Mac(or UUID) of the camera. Therefore, if you have multiple cameras, you need to make the order for each single camera which you need cloud storage service.
1. How to enable ‘Alert’ function and set the sensitivity
Once the camera is successfully added, click the alert icon on the ‘My Devices’ interface to enable the alert feature. It can also be turned on in‘Device Settings’ - ‘Alert’ - ‘Motion Detected’. The alarm sensitivity is divided into 0-5 6 levels. The higher the level, the higher the sensitivity and the easier it is to trigger an alarm.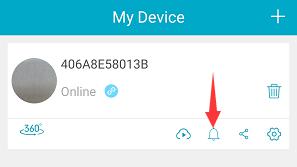

 Note: Viewing alert messages requires need a memory card or cloud storage service.
It maybe the mobile phone does not allow the ‘notification permission’ of the app, you need to find and enable it in the system settings of the mobile phone.
Note: Due to the difference of mobile phone systems, the notification function may not be unified when the phone is in standby.
Note: Due to the difference of mobile phone systems, the notification function may not be unified when the phone is in standby.
First, to be sure the ‘Motion Detected’(you will see it in ‘Alert’ page) function is turn on. Second, check the setting of alarm sensibility. The lower level is harder to trigger an alert. Try to enhance the level and try again.
Sometimes, the change of the light could trigger an alert. The sensitivity can be adjusted to lower level to reduce the false alarms, but it may cause some real alert missed at same time. Please do it carefully.
Note: If your camera has PIR detect function, the sensitivity for this function is fixed.
Note: If your camera has PIR detect function, the sensitivity for this function is fixed.
Camera offline
When the camera is offline, you need to observe the indicator status of the device:
A.Red light is always on
Unplug and plug in the power adapter of camera, then try the reset the camera. If it still does not work, the camera is broken.
B.Green light is always on
① To be sure the router is connected to internet.
② Most time, it means WIFI signal is too weak. Please try to reduce the distance between the camera and WIFI router(or remove the obstacles).
③ Try to reset the camera and add again.
② Most time, it means WIFI signal is too weak. Please try to reduce the distance between the camera and WIFI router(or remove the obstacles).
③ Try to reset the camera and add again.
C.Flashing light slowly in red
① Most time, it means WIFI signal is too weak. Please try to reduce the distance between the camera and WIFI router(or remove the obstacles).
② Try to reset the camera and add again.
② Try to reset the camera and add again.
1. Why is the time displayed when viewing a video is different from the timeline
Our app will prompt you to adjust the camera time when the camera time does not match the phone system time. You can restart the app and then turn on the camera and you will be prompted. If you need to manually adjust the time zone, you can also modify the camera's time zone in ‘Device Settings’ - ‘Language and Time Zone’ - ‘Time Zone Setting’. As long as the camera's time is changed to match the time of the mobile phone system, the video can be viewed normally.
Note: When the time zone is wrong, the old recorded video will not return to the correct position after the time zone is adjusted correctly. Only the newly recorded video will be displayed in the correct position.

Note: When the time zone is wrong, the old recorded video will not return to the correct position after the time zone is adjusted correctly. Only the newly recorded video will be displayed in the correct position.
1. How to share camera
Click the share icon, enter the account you want to share the camera
Note: The account you want to share the camera must be registered already.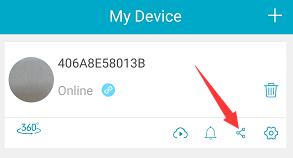
Note: The account you want to share the camera must be registered already.
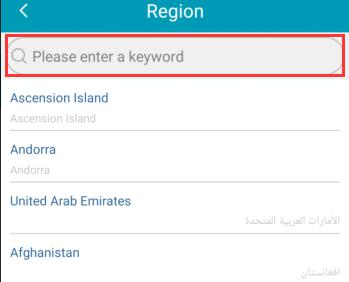
The account which you want to share the camera must log in to the app at least once, and must be at same country with your account. For example, when the primary account is registered and logged in the United States.
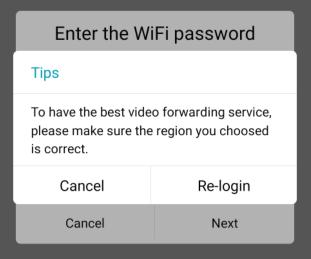
After logging in to the app, click the ‘+’ button in the upper right corner. After entering, select ‘Camera’ and press next. Then you will see ‘Change Region’, click to select the right country name. After that, APP may prompt ‘Re-login’,after re-login,the location of the app will be changed.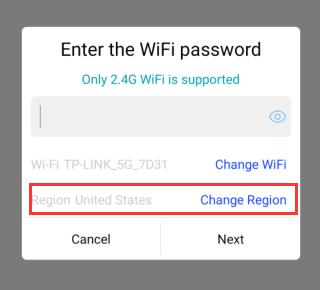
It may make you confused if the setting of camera is changed without your knowledge. So this rule is made.
1. Why app often prompt ‘Decryption failed’ / ‘Please enter an encrypted Password’ when watching
We recommend you to update the app to the latest version in Apple Store/Google Play to solve the problem.
In this case, you need to send a message by ‘Feedback’ function in the app. We will help you to solve the issue.
| Corporate Office: 1410 E. Walnut Ave Fullerton, CA 92831 | |
| Tel: (714)-525-9800 | Fax: (714)-525-9801 |
| Copyright © 2019 Inland Products Inc. All Rights Reserved. | |
 Contact Us